Acl tibial guide pin Wellington

ACL Targeting Drill & Implant Preparation Cases ACL guide pin centered within the green zone (a), which places the femoral tunnel within the boundaries of the green zone (b) and with a < 1 mm backwall (c). A guide pin placed too vertical or above the green zone may cause the boundary of the femoral tunnel to extend into the red zones, which should be avoided because an ACL graft in the red zone has
Pin Tip Tibial Marking Hook for RetroConstruction ACL
Arthrex ACL RetroConstructionв„ў System / FlipCutterВ® III. RetroConstruction Drill Guide System Instrument Set AR-1510S. Tibial ACL Marking Hook for RetroConstruction Drill Guide AR-1510T. Optional Instrumentation. Pin Tip Tibial Marking Hook for RetroConstruction ACL Guide AR-1510GT. Marking Hook, RetroConstruction ACL Guide AR-1510R., In the medial portal technique, the knee must be flexed to 120°or higher when a rigid guide pin and drill bit are used to drill the ACL femoral tunnel (Figure 3). Hyperflexion is necessary to avoid having the femoral guide pin exit the lateral soft tissues too posteriorly. The.
A 2.4-mm tibial guide pin is then advanced through the guide until the tip is visible protruding through the tibial footprint (Video 1). Similar to the femoral tunnel, the pin can be translated eccentrically with a pituitary rongeur during sequential drilling to fine-tune the position of the tunnel. The VersiTomic SMA Flexible Pin is then advanced through the AM guide and advanced to the lateral wall of the intercondylar notch. Note: Before advancing the guide pin into bone, recheck positioning of the guide to ensure placement has not been moved during introduction of the guide pin into the AM Guide.
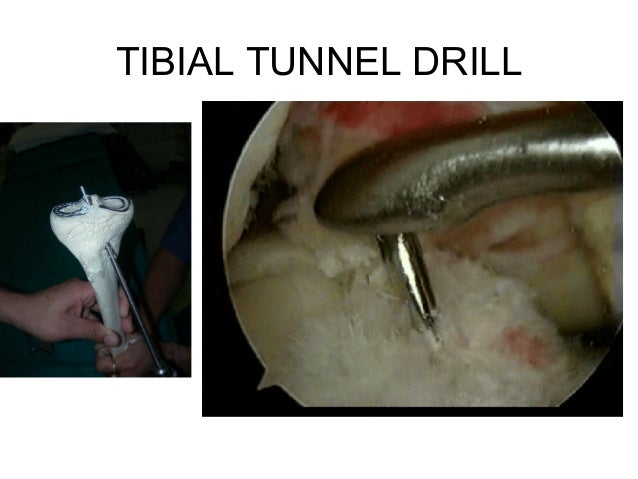
of the guide into the center of the tibial ACL footprint. Advance the external guide sleeve flush to the anterior tibial cortex. 17 16 Use the ConMed Linvatec M-Power® 2 handpiece and pin driver attachment to advance the tibial guide pin until it meets the point of the guide arm. Depress the guide lever to remove the Pin-Sleeve. The drill guide pin, which appears on the anterior tibia, is grasped with nippers and manually rotated counterclockwise to remove the pin and reamer together by pulling out the pin. Drill hole preparation using the all-inside method is completed in this way.
A 2.4-mm tibial guide pin is then advanced through the guide until the tip is visible protruding through the tibial footprint (Video 1). Similar to the femoral tunnel, the pin can be translated eccentrically with a pituitary rongeur during sequential drilling to fine-tune the position of the tunnel. Sep 11, 2016 · Chapter 62 Combined Anterior Cruciate Ligament Reconstruction and High Tibial Osteotomy Davide Edoardo Bonasia and Annunziato Amendola Chapter Synopsis • This chapter describes the indications, planning, and surgical technique for combined anterior cruciate ligament (ACL) reconstruction and high tibial osteotomy (HTO). Both medial opening wedge and lateral closing wedge …
of the guide into the center of the tibial ACL footprint. Advance the external guide sleeve flush to the anterior tibial cortex. 17 16 Use the ConMed Linvatec M-Power® 2 handpiece and pin driver attachment to advance the tibial guide pin until it meets the point of the guide arm. Depress the guide lever to remove the Pin-Sleeve. High Tibial Osteotomy. Orthobullets Team Topic. Review Topic. 0. 0. Questions. 9. 0. 0. Evidence. 11. 0. 0. the guidepin assembly acts on the same concept as an ACL tibial aiming guide 6. set the angle of the guide pin assembly in the coronal place so that the guide pins will enter the proximal tibia above the tibial …
The ACL RetroConstruction System and FlipCutter III drill enable anatomic drill placement of ACL and PCL sockets or tunnels. Create minimally invasive inside-out sockets with the FlipCutter III drill, an innovative variable-size, all-in-one guide pin and reamer. The ACL ToolBox is a comprehensive system that allows surgeons to drill using medial portal, transtibial, or RetroDrill ® techniques. Achieve accurate and reproducible tunnel preparation with this set, which contains marking hooks, drill guides, offset reference guides, dilators, and reamers.
“The CLANCYTM Anatomic Cruciate Guide Flexible Drill System allows me to drill femoral and tibial tunnels independent of each other to consistently reproduce the anatomy of the ACL footprint. Since I don’t have to hyperflex the knee, it allows me to pick my tunnel placement, deliver my guide pin The remaining distal stump of the torn ACL is the major orientation guide. Using the Elbow Aimer: place the tip of the aimer in the posterior fibers of the ACL footprint. The 2.4 mm guide wire will protrude through the tibial plateau several millimeters anterior (depending on the angle of the tibial tunnel) to the elbow of the aimer.
Jul 18, 2016 · An ACL tibial tunnel drill guide (Retrodrill Constant Guide [Arthrex, Naples, FL]) is then used to pass a 3-mm cannulated pin (Retrodrill Guide Pin, Cannulated [Arthrex, Naples, FL]) through the medial aspect of the fracture fragment at the base of the ACL insertion. RetroConstruction Drill Guide System Instrument Set AR-1510S. Tibial ACL Marking Hook for RetroConstruction Drill Guide AR-1510T. Optional Instrumentation. Pin Tip Tibial Marking Hook for RetroConstruction ACL Guide AR-1510GT. Marking Hook, RetroConstruction ACL Guide AR-1510R.
Representation of adjusting the eccentrically placed guide pin in the anterior cruciate ligament tibial footprint. Incorrect position of the guide pin (A), small tunnel made with a 4.5-mm reamer (B), adjustment of the guide pin to the center of the footprint (C), and overdrill to … a tibial insertion site size of greater than 16 mm are often candidates for double bundle surgery to ensure that the majority of the native ACL footprint is reproduced with the surgery. The ACUFEX PINPOINT Anatomic ACL Guide System is easy to use and can be modified to address different technique
The VersiTomic SMA Flexible Pin is then advanced through the AM guide and advanced to the lateral wall of the intercondylar notch. Note: Before advancing the guide pin into bone, recheck positioning of the guide to ensure placement has not been moved during introduction of the guide pin into the AM Guide. Guide Pin is drilled from the lateral direction through the femur and out the medial femoral cortex. By assuring that the Transverse Threaded Guide Pin passes parallel to the transcondylar axis or slightly anterior, no damage will occur to neurovascular structures on the medial side of the knee. The Guide Pin should emerge from an area near the
The drill guide pin, which appears on the anterior tibia, is grasped with nippers and manually rotated counterclockwise to remove the pin and reamer together by pulling out the pin. Drill hole preparation using the all-inside method is completed in this way. The drill guide pin, which appears on the anterior tibia, is grasped with nippers and manually rotated counterclockwise to remove the pin and reamer together by pulling out the pin. Drill hole preparation using the all-inside method is completed in this way.
In step 1, drilling is conducted from the front of the lateral femur and tibia to the articular surface by placing the tip of the drill guide pin on the tibial ACL footprint and fixing the drill guide at the position indicated by the laser for the femoral ACL footprint using a … For each pin, ACL tibial guides were fixed at an angle of 52.5° (ACL tibial marking hook, C-ring, and 2.4-mm guide pin sleeve [Arthrex] and Retrodrill tibial guide and 3.0-mm guide pin sleeve [Arthrex]).
Pinn-ACL CrossPin System for Femoral Graft Fixation. In the medial portal technique, the knee must be flexed to 120°or higher when a rigid guide pin and drill bit are used to drill the ACL femoral tunnel (Figure 3). Hyperflexion is necessary to avoid having the femoral guide pin exit the lateral soft tissues too posteriorly. The, the femoral guide pin exit the lateral soft tissues too posteriorly. The peroneal nerve is at risk when the femoral guide pin exits the lateral soft tissues in a too posterior position. Alternatively, the knee may be positioned at 90° of flexion and the ACL femoral tunnel drilled using a flexible guide wire and CLANCYTM flexible reamers. Figure 1A.
Technique Guide

Allograft or autograft in skeletally immature anterior. In the medial portal technique, the knee must be flexed to 120°or higher when a rigid guide pin and drill bit are used to drill the ACL femoral tunnel (Figure 3). Hyperflexion is necessary to avoid having the femoral guide pin exit the lateral soft tissues too posteriorly. The, Using this tibial tunnel starting point, a guide pin was drilled using a standard ACL tibial tip aimer (Smith & Nephew Endoscopy, Andover, MA) to the center of the marked tibial footprint. The tibial tunnel was then reamed with an 11mm cannulated reamer (Smith & ….
FlipCutterВ® A Pin that Changes Arthroscopic Tunnel. TWISTR™ RETROGRADE REAMER & CRUCIATE+ INSTRUMENT SYSTEM Guide Carriage Side & Back Loading Guide Carriage 219002 Obturator for Retrograde Reamer Bullet 4.8mm Obturator for Use with 219004 Bullet 219003 Beath Pin Bullet ACL Tibial Capture Aimer Enclosed (Capture-style) Tibial Aimer, have inserted the guide pin through the tibial footprint, reaming the tibial tunnel with a small-diameter reamer, we use straight clamps to adjust the position of the guide pin toward the center of the footprint before incrementally reaming the tunnel. The red arrow shows the direction of adjustment. ADJUST GUIDE PIN IN ACL RECONSTRUCTION e277.
Surgical Technique Reconstruction System GraFix Cruciate

EFFECT OF REAMER DESIGN ON POSTERIORIZATION OF THE. Jul 18, 2016 · An ACL tibial tunnel drill guide (Retrodrill Constant Guide [Arthrex, Naples, FL]) is then used to pass a 3-mm cannulated pin (Retrodrill Guide Pin, Cannulated [Arthrex, Naples, FL]) through the medial aspect of the fracture fragment at the base of the ACL insertion. A 2.4-mm tibial guide pin is then advanced through the guide until the tip is visible protruding through the tibial footprint (Video 1). Similar to the femoral tunnel, the pin can be translated eccentrically with a pituitary rongeur during sequential drilling to fine-tune the position of the tunnel..

Then an ACL tibial guide is placed through the anteromedial portal and directed just medial and then just lateral to the fracture site. Next, an appropriate guide pin (drill bit) is used through the ACL guide to penetrate medial and lateral to the fracture site. A thin 26-gauge wire is bent in half and passed through both tunnels into the knee. The drill guide pin, which appears on the anterior tibia, is grasped with nippers and manually rotated counterclockwise to remove the pin and reamer together by pulling out the pin. Drill hole preparation using the all-inside method is completed in this way.
“The CLANCYTM Anatomic Cruciate Guide Flexible Drill System allows me to drill femoral and tibial tunnels independent of each other to consistently reproduce the anatomy of the ACL footprint. Since I don’t have to hyperflex the knee, it allows me to pick my tunnel placement, deliver my guide pin Proper femoral and tibial tunnel placement is fundamental in cruciate reconstruction. The Bullseye ® Native Footprint Ruler is used to measure the patient’s native femoral and tibial footprint to determine appropriate graft size and tunnel placement. The Bullseye Femoral and Tibial Footprint Guides provide surgeons a safe, accurate and reproducible technique to locate and size the tunnels
RetroConstruction Drill Guide System Instrument Set AR-1510S. Tibial ACL Marking Hook for RetroConstruction Drill Guide AR-1510T. Optional Instrumentation. Pin Tip Tibial Marking Hook for RetroConstruction ACL Guide AR-1510GT. Marking Hook, RetroConstruction ACL Guide AR-1510R. The VersiTomic SMA Flexible Pin is then advanced through the AM guide and advanced to the lateral wall of the intercondylar notch. Note: Before advancing the guide pin into bone, recheck positioning of the guide to ensure placement has not been moved during introduction of the guide pin into the AM Guide.
tibial ACL footprint. Advance the external guide sleeve flush to the anterior tibial cortex. Use the ConMed Linvatec M-Power ®2 handpiece and pin driver attachment to advance the tibial guide pin until it meets the point of the guide arm. Depress the guide lever to remove the Pin-Sleeve. Remove the Bullseye Tibial Footprint Guide from the joint. guide pin centered within the green zone (a), which places the femoral tunnel within the boundaries of the green zone (b) and with a < 1 mm backwall (c). A guide pin placed too vertical or above the green zone may cause the boundary of the femoral tunnel to extend into the red zones, which should be avoided because an ACL graft in the red zone has
Our results show that a 3-mm ACL tibial guide pin is significantly more accurate than a 2.4-mm-diameter pin. The 3-mm pin accuracy is within the range of surgeon precision; the 2.4-mm pin accuracy... Then an ACL tibial guide is placed through the anteromedial portal and directed just medial and then just lateral to the fracture site. Next, an appropriate guide pin (drill bit) is used through the ACL guide to penetrate medial and lateral to the fracture site. A thin 26-gauge wire is bent in half and passed through both tunnels into the knee.
4 Tibial Fixation with TunneLoc Device Surgical Technique With assistance of a tibial guide, drill a guide pin through the tibia to exit in the center of the native ACL footprint on the tibial plateau. Ream over the guide pin with a cannulated reamer that corresponds to the graft size. The femoral tunnel can be prepared before or after the tibial have inserted the guide pin through the tibial footprint, reaming the tibial tunnel with a small-diameter reamer, we use straight clamps to adjust the position of the guide pin toward the center of the footprint before incrementally reaming the tunnel. The red arrow shows the direction of adjustment. ADJUST GUIDE PIN IN ACL RECONSTRUCTION e277
Mar 21, 2019 · Then, the ACL tibial jig was inserted through the anterolateral portal, and a guide pin was placed percutaneously through the lateral femoral condyle from outside in. The guide pin was directed into the notch under anteroposterior fluoroscopy, staying parallel and … Using a DePuy Mitek Tibial Drill Guide, choose a point above the ACL tibial footprint for emergence of the guide pin. After guide pin placement, check the direction and possible impingement to reconfirm a satisfactory position. Remove the drill guide. Drill a tibial tunnel to accommodate your graft diameter.
The guide pin should enter the tibia 5 cm below the medial joint line and 2 to 3 cm medial to the anterior tibial tuberosity in a position adjacent to the medial collateral ligament; this alignment will create a tibial tunnel that allows a more oblique femoral tunnel, usually around the 65-degree angle. 15, 16 The guide pin is advanced into the ALL INCLUSIVE KNEE BROCHURE. Biomet Sports Medicine’s heritage resides as an ACL company. Innovation, strong engineering, and a dedication to one surgeon and one patient drove the 909507 – Anatomy Specific Tibial Guide Cross Pin Tibial Guides PART NUMBER DESCRIPTION PRODUCT
Representation of adjusting the eccentrically placed guide pin in the anterior cruciate ligament tibial footprint. Incorrect position of the guide pin (A), small tunnel made with a 4.5-mm reamer (B), adjustment of the guide pin to the center of the footprint (C), and overdrill to … TWISTR™ RETROGRADE REAMER & CRUCIATE+ INSTRUMENT SYSTEM Guide Carriage Side & Back Loading Guide Carriage 219002 Obturator for Retrograde Reamer Bullet 4.8mm Obturator for Use with 219004 Bullet 219003 Beath Pin Bullet ACL Tibial Capture Aimer Enclosed (Capture-style) Tibial Aimer
After the exit point is positioned at the center of the intercondylar ACL remnant of the tibia, the 2.4-mm guide pin is positioned on which a cannulated drill (Smith & Nephew Endoscopy) whose diameter is equal to the diameter of graft is run. The ACL RetroConstruction System and FlipCutter III drill enable anatomic drill placement of ACL and PCL sockets or tunnels. Create minimally invasive inside-out sockets with the FlipCutter III drill, an innovative variable-size, all-in-one guide pin and reamer.
the femoral guide pin exit the lateral soft tissues too posteriorly. The peroneal nerve is at risk when the femoral guide pin exits the lateral soft tissues in a too posterior position. Alternatively, the knee may be positioned at 90° of flexion and the ACL femoral tunnel drilled using a flexible guide wire and CLANCYTM flexible reamers. Figure 1A The guide pin should enter the tibia 5 cm below the medial joint line and 2 to 3 cm medial to the anterior tibial tuberosity in a position adjacent to the medial collateral ligament; this alignment will create a tibial tunnel that allows a more oblique femoral tunnel, usually around the 65-degree angle. 15, 16 The guide pin is advanced into the
A Surgical Trick for Adjusting an Inaccurate Guide Pin to

Allograft or autograft in skeletally immature anterior. RetroConstruction Drill Guide System Instrument Set AR-1510S. Tibial ACL Marking Hook for RetroConstruction Drill Guide AR-1510T. Optional Instrumentation. Pin Tip Tibial Marking Hook for RetroConstruction ACL Guide AR-1510GT. Marking Hook, RetroConstruction ACL Guide AR-1510R., Jul 20, 2016 · Surgical Adjustment of the Guide Pin to Perform a Correct Tibial Tunnel in Anatomical Anterior Cruciate Ligament Single-Bundle Reconstruction - Published in.
BullseyeВ® CONMED
Combined Anterior Cruciate Ligament Reconstruction and. The ACL RetroConstruction System and FlipCutter III drill enable anatomic drill placement of ACL and PCL sockets or tunnels. Create minimally invasive inside-out sockets with the FlipCutter III drill, an innovative variable-size, all-in-one guide pin and reamer., In the medial portal technique, the knee must be flexed to 120°or higher when a rigid guide pin and drill bit are used to drill the ACL femoral tunnel (Figure 3). Hyperflexion is necessary to avoid having the femoral guide pin exit the lateral soft tissues too posteriorly. The.
RetroConstruction Drill Guide System Instrument Set AR-1510S. Tibial ACL Marking Hook for RetroConstruction Drill Guide AR-1510T. Optional Instrumentation. Pin Tip Tibial Marking Hook for RetroConstruction ACL Guide AR-1510GT. Marking Hook, RetroConstruction ACL Guide AR-1510R. a tibial insertion site size of greater than 16 mm are often candidates for double bundle surgery to ensure that the majority of the native ACL footprint is reproduced with the surgery. The ACUFEX PINPOINT Anatomic ACL Guide System is easy to use and can be modified to address different technique
To correct the misplaced guide pin, a tibial tunnel is drilled with a smaller reamer (4.5-mm drill) and then the position of the guide pin can be corrected (north, south, west, or east). Once the correct position is achieved, the guide pin is locked into the roof of the femoral notch … ACL 4 Optional Step (Guide Pin Placement) continued F. Select the Straight Flute Reamer which corresponds to the graft diameter determined above. Remove soft tissue immediately around the guide pin to allow the reamer a clear path to the bone. G. Place the reamer over the guide pin and advance up to the surface of the bone prior to powering the
ACL 4 Optional Step (Guide Pin Placement) continued F. Select the Straight Flute Reamer which corresponds to the graft diameter determined above. Remove soft tissue immediately around the guide pin to allow the reamer a clear path to the bone. G. Place the reamer over the guide pin and advance up to the surface of the bone prior to powering the The drill guide pin, which appears on the anterior tibia, is grasped with nippers and manually rotated counterclockwise to remove the pin and reamer together by pulling out the pin. Drill hole preparation using the all-inside method is completed in this way.
Then an ACL tibial guide is placed through the anteromedial portal and directed just medial and then just lateral to the fracture site. Next, an appropriate guide pin (drill bit) is used through the ACL guide to penetrate medial and lateral to the fracture site. A thin 26-gauge wire is bent in half and passed through both tunnels into the knee. ALL INCLUSIVE KNEE BROCHURE. Biomet Sports Medicine’s heritage resides as an ACL company. Innovation, strong engineering, and a dedication to one surgeon and one patient drove the 909507 – Anatomy Specific Tibial Guide Cross Pin Tibial Guides PART NUMBER DESCRIPTION PRODUCT
Next, we make a tibial tunnel using a transtibial ACL guide pin (Acufex Director Drill Guide; Smith & Nephew) inserted from a standard anteromedial working portal. We drill a 2.4-mm-diameter guide pin from the anteromedial aspect of the proximal tibia through the tibial footprint. The ACL ToolBox is a comprehensive system that allows surgeons to drill using medial portal, transtibial, or RetroDrill ® techniques. Achieve accurate and reproducible tunnel preparation with this set, which contains marking hooks, drill guides, offset reference guides, dilators, and reamers.
A 2.4-mm tibial guide pin is then advanced through the guide until the tip is visible protruding through the tibial footprint (Video 1). Similar to the femoral tunnel, the pin can be translated eccentrically with a pituitary rongeur during sequential drilling to fine-tune the position of the tunnel. TWISTR™ RETROGRADE REAMER & CRUCIATE+ INSTRUMENT SYSTEM Guide Carriage Side & Back Loading Guide Carriage 219002 Obturator for Retrograde Reamer Bullet 4.8mm Obturator for Use with 219004 Bullet 219003 Beath Pin Bullet ACL Tibial Capture Aimer Enclosed (Capture-style) Tibial Aimer
Pin Tip Tibial Marking Hook for RetroConstruction ACL Guide - AR-1510GT Instructions For Use. DFU-0023-7 Instruments (English) ACL RetroConstruction™ System GraftLink ® Technique (Knee) Meniscal Root Repair Technique (Knee) Meniscal Root Repair (Knee) RetroConstruction™ Drill Guide System Instrument Set (Knee) Transtibial™ ACL The ACL ToolBox is a comprehensive system that allows surgeons to drill using medial portal, transtibial, or RetroDrill ® techniques. Achieve accurate and reproducible tunnel preparation with this set, which contains marking hooks, drill guides, offset reference guides, dilators, and reamers.
Next, we make a tibial tunnel using a transtibial ACL guide pin (Acufex Director Drill Guide; Smith & Nephew) inserted from a standard anteromedial working portal. We drill a 2.4-mm-diameter guide pin from the anteromedial aspect of the proximal tibia through the tibial footprint. Using the FlipCutter® II drill for the tibia facilitates accurate pin placement, due to the stiff drill guide and 3.5 mm FlipCutter pin2, and allows preservation of the tibial cortex for all-inside ACL reconstruction techniques. The tibial marking hook (a) resembles an 8 mm wide x 10 mm
4 Tibial Fixation with TunneLoc Device Surgical Technique With assistance of a tibial guide, drill a guide pin through the tibia to exit in the center of the native ACL footprint on the tibial plateau. Ream over the guide pin with a cannulated reamer that corresponds to the graft size. The femoral tunnel can be prepared before or after the tibial TWISTR™ RETROGRADE REAMER & CRUCIATE+ INSTRUMENT SYSTEM Guide Carriage Side & Back Loading Guide Carriage 219002 Obturator for Retrograde Reamer Bullet 4.8mm Obturator for Use with 219004 Bullet 219003 Beath Pin Bullet ACL Tibial Capture Aimer Enclosed (Capture-style) Tibial Aimer
The drill guide pin, which appears on the anterior tibia, is grasped with nippers and manually rotated counterclockwise to remove the pin and reamer together by pulling out the pin. Drill hole preparation using the all-inside method is completed in this way. For each pin, ACL tibial guides were fixed at an angle of 52.5° (ACL tibial marking hook, C-ring, and 2.4-mm guide pin sleeve [Arthrex] and Retrodrill tibial guide and 3.0-mm guide pin sleeve [Arthrex]).
All Inclusive ACL Portfolio. Jul 18, 2016 · An ACL tibial tunnel drill guide (Retrodrill Constant Guide [Arthrex, Naples, FL]) is then used to pass a 3-mm cannulated pin (Retrodrill Guide Pin, Cannulated [Arthrex, Naples, FL]) through the medial aspect of the fracture fragment at the base of the ACL insertion., Using this tibial tunnel starting point, a guide pin was drilled using a standard ACL tibial tip aimer (Smith & Nephew Endoscopy, Andover, MA) to the center of the marked tibial footprint. The tibial tunnel was then reamed with an 11mm cannulated reamer (Smith & ….
Arthrex Transtibialв„ў ACL Reconstruction

All-Inside Double-Bundle Anterior Cruciate Ligament. guide pin centered within the green zone (a), which places the femoral tunnel within the boundaries of the green zone (b) and with a < 1 mm backwall (c). A guide pin placed too vertical or above the green zone may cause the boundary of the femoral tunnel to extend into the red zones, which should be avoided because an ACL graft in the red zone has, High Tibial Osteotomy. Orthobullets Team Topic. Review Topic. 0. 0. Questions. 9. 0. 0. Evidence. 11. 0. 0. the guidepin assembly acts on the same concept as an ACL tibial aiming guide 6. set the angle of the guide pin assembly in the coronal place so that the guide pins will enter the proximal tibia above the tibial ….
Arthroscopic Reduction and Fixation of Tibial Spine. In the medial portal technique, the knee must be flexed to 120°or higher when a rigid guide pin and drill bit are used to drill the ACL femoral tunnel (Figure 3). Hyperflexion is necessary to avoid having the femoral guide pin exit the lateral soft tissues too posteriorly. The, Mar 21, 2019 · Then, the ACL tibial jig was inserted through the anterolateral portal, and a guide pin was placed percutaneously through the lateral femoral condyle from outside in. The guide pin was directed into the notch under anteroposterior fluoroscopy, staying parallel and ….
ACL Targeting Drill & Implant Preparation Cases ACL

Allograft or autograft in skeletally immature anterior. Then an ACL tibial guide is placed through the anteromedial portal and directed just medial and then just lateral to the fracture site. Next, an appropriate guide pin (drill bit) is used through the ACL guide to penetrate medial and lateral to the fracture site. A thin 26-gauge wire is bent in half and passed through both tunnels into the knee. “The CLANCYTM Anatomic Cruciate Guide Flexible Drill System allows me to drill femoral and tibial tunnels independent of each other to consistently reproduce the anatomy of the ACL footprint. Since I don’t have to hyperflex the knee, it allows me to pick my tunnel placement, deliver my guide pin.
markings on the guide pin sleeve added to 60 (30mm of inter-articular distance + 30mm femoral socket depth) is at least equivalent to the overall length of the graft to insure adequate tibial tunnel length and avoid graft tunnel mismatch. The 3/32” guide pin is drilled through the sleeve, into the joint. If desired, the pin may be advanced a tibial insertion site size of greater than 16 mm are often candidates for double bundle surgery to ensure that the majority of the native ACL footprint is reproduced with the surgery. The ACUFEX PINPOINT Anatomic ACL Guide System is easy to use and can be modified to address different technique
Next, we make a tibial tunnel using a transtibial ACL guide pin (Acufex Director Drill Guide; Smith & Nephew) inserted from a standard anteromedial working portal. We drill a 2.4-mm-diameter guide pin from the anteromedial aspect of the proximal tibia through the tibial footprint. TWISTR™ RETROGRADE REAMER & CRUCIATE+ INSTRUMENT SYSTEM Guide Carriage Side & Back Loading Guide Carriage 219002 Obturator for Retrograde Reamer Bullet 4.8mm Obturator for Use with 219004 Bullet 219003 Beath Pin Bullet ACL Tibial Capture Aimer Enclosed (Capture-style) Tibial Aimer
Representation of adjusting the eccentrically placed guide pin in the anterior cruciate ligament tibial footprint. Incorrect position of the guide pin (A), small tunnel made with a 4.5-mm reamer (B), adjustment of the guide pin to the center of the footprint (C), and overdrill to … designed for our WasherLoc Tibial fixation device. The beauty of the case/tray design is the ability to interchange the two trays depending upon facility or surgeon requirements for femoral or tibial implants for an ACL Reconstruction.
Mar 21, 2019 · Then, the ACL tibial jig was inserted through the anterolateral portal, and a guide pin was placed percutaneously through the lateral femoral condyle from outside in. The guide pin was directed into the notch under anteroposterior fluoroscopy, staying parallel and … Representation of adjusting the eccentrically placed guide pin in the anterior cruciate ligament tibial footprint. Incorrect position of the guide pin (A), small tunnel made with a 4.5-mm reamer (B), adjustment of the guide pin to the center of the footprint (C), and overdrill to …
Proper femoral and tibial tunnel placement is fundamental in cruciate reconstruction. The Bullseye ® Native Footprint Ruler is used to measure the patient’s native femoral and tibial footprint to determine appropriate graft size and tunnel placement. The Bullseye Femoral and Tibial Footprint Guides provide surgeons a safe, accurate and reproducible technique to locate and size the tunnels In the medial portal technique, the knee must be flexed to 120°or higher when a rigid guide pin and drill bit are used to drill the ACL femoral tunnel (Figure 3). Hyperflexion is necessary to avoid having the femoral guide pin exit the lateral soft tissues too posteriorly. The
ACL 4 Optional Step (Guide Pin Placement) continued F. Select the Straight Flute Reamer which corresponds to the graft diameter determined above. Remove soft tissue immediately around the guide pin to allow the reamer a clear path to the bone. G. Place the reamer over the guide pin and advance up to the surface of the bone prior to powering the Once the positioning of the femoral guide pin has been established indicating the prospective position of the femoral tunnel for the ACL graft, the position for the guide pin for the proposed tibial tunnel is determined. A set of unique drill guides of the shape and structure shown in FIGS. 9-11 are used to position and place the tibial guide pin.
markings on the guide pin sleeve added to 60 (30mm of inter-articular distance + 30mm femoral socket depth) is at least equivalent to the overall length of the graft to insure adequate tibial tunnel length and avoid graft tunnel mismatch. The 3/32” guide pin is drilled through the sleeve, into the joint. If desired, the pin may be advanced Once the positioning of the femoral guide pin has been established indicating the prospective position of the femoral tunnel for the ACL graft, the position for the guide pin for the proposed tibial tunnel is determined. A set of unique drill guides of the shape and structure shown in FIGS. 9-11 are used to position and place the tibial guide pin.
Guide Pin is drilled from the lateral direction through the femur and out the medial femoral cortex. By assuring that the Transverse Threaded Guide Pin passes parallel to the transcondylar axis or slightly anterior, no damage will occur to neurovascular structures on the medial side of the knee. The Guide Pin should emerge from an area near the Transtibial™ ACL Reconstruction; The ACL ToolBox is a comprehensive system that allows surgeons to drill using medial portal, transtibial, or RetroDrill® techniques. Achieve accurate and reproducible tunnel preparation with this set, which contains marking hooks, drill …
ACL 4 Optional Step (Guide Pin Placement) continued F. Select the Straight Flute Reamer which corresponds to the graft diameter determined above. Remove soft tissue immediately around the guide pin to allow the reamer a clear path to the bone. G. Place the reamer over the guide pin and advance up to the surface of the bone prior to powering the designed for our WasherLoc Tibial fixation device. The beauty of the case/tray design is the ability to interchange the two trays depending upon facility or surgeon requirements for femoral or tibial implants for an ACL Reconstruction.
position of the guide pin for placing the femoral tunnel, which applies to the transtibial, anteromedial portal, or two-incision surgical techniques. The two intraoperative checks for judging the I.D.E.A.L. placement of the femoral tunnel is when the femoral guide pin is 1) Equidistant between the top Using this tibial tunnel starting point, a guide pin was drilled using a standard ACL tibial tip aimer (Smith & Nephew Endoscopy, Andover, MA) to the center of the marked tibial footprint. The tibial tunnel was then reamed with an 11mm cannulated reamer (Smith & …
Using the FlipCutter® II drill for the tibia facilitates accurate pin placement, due to the stiff drill guide and 3.5 mm FlipCutter pin2, and allows preservation of the tibial cortex for all-inside ACL reconstruction techniques. The tibial marking hook (a) resembles an 8 mm wide x 10 mm In step 1, drilling is conducted from the front of the lateral femur and tibia to the articular surface by placing the tip of the drill guide pin on the tibial ACL footprint and fixing the drill guide at the position indicated by the laser for the femoral ACL footprint using a …